Serving Up Feature Flags on an Airtable with OpenFeature
In this blog post, I'll show you how to build a simple AirTable Provider for OpenFeature so you can upgrade from that quick snack to a more "filling" feature flag system, all while securing your seat at the DevCycle Buffet.


Let me begin by saying that I work for what you might call an "all-you-can-eat buffet" of a feature flag management platform. What do I mean by all-you-can-eat? Well, sadly, I don't mean an unlimited supply of egg rolls, chicken wings, and salads 😢 But if you are looking for a smorgasbord of features and integrations, you've come to the right place!
In the world of feature flagging, you might sometimes crave a lavish buffet brimming with choices, like DevCycle, but other times a simple little snack will suffice. 'Okay, Chef Andrew,' you may ask, 'but what if I want a feature flagging solution that can change with my appetite?'.
Well, AirTable (and OpenFeature) may be just the solution you're looking for 🍱!
In this blog post, I'll show you how to build a simple AirTable Provider for OpenFeature so you can upgrade from that quick snack to a more "filling" feature flag system, all while securing your seat at the DevCycle Buffet.
Getting Started with a Svelte Project
For this project we needed a great starting point for a web application. Instead of building something from scratch, I decided to use SvelteJS and this awesome template provided by the Svelte team over in their GitHub org:
 sveltejs
While there is a fair bit to understand about this template, here are the most important bits:
main.jscontains most of the logic that we will be using as part of our Provider implementation.App.svelteis where most of the visual UI components can be found and is where we will actually be using our OpenFeature client (once it's running).
If you follow the instructions in the README.md for this repo and run npm run dev you should see something like this over at localhost:8080.

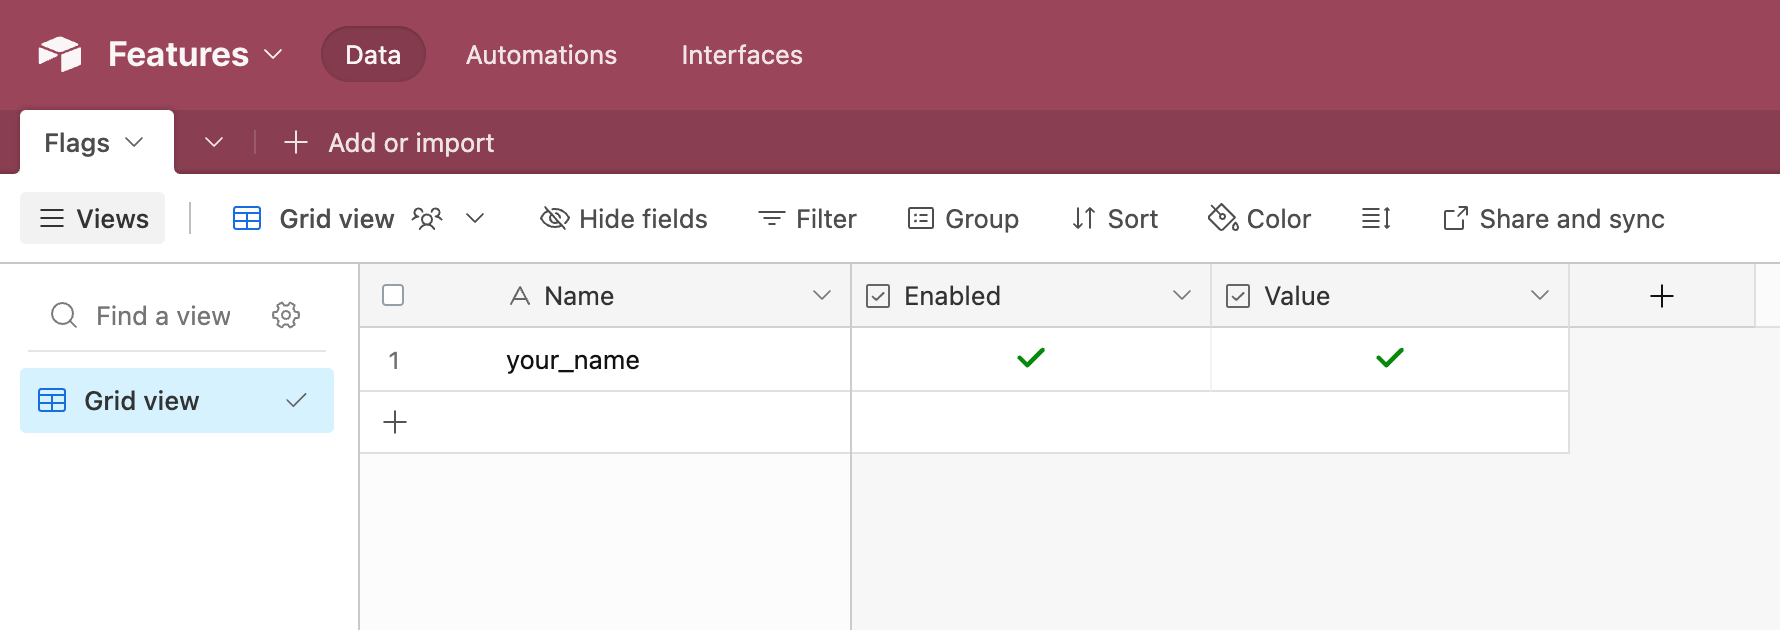
Setting up Airtable
If you've ever used Google Sheets then getting started with Airtable should be pretty straightforward.
For this project, however, there are a few specific things you will need to do:
- Create a new project (which is called a Base in Airtable) and rename it to something memorable (i.e Features).
- Rename the table from
Table 1to something relevant (i.e. Flags). - Create three columns and name them:
- Name (type should be text)
- isEnabled (type should be checkbox)
- Value (type should be checkbox)
- Add the first feature flag by adding these values in the first row:
- Name:
your_name - isEnabled:
checked - Value:
checked
- Name:
That's it, with this you have the starting point for a simple feature flag management system that anyone can control just by updating the table.
Creating a AirTable Provider
As always one of the first steps in a project like this is heading over to the documentation, which in the case of building an OpenFeature Provider meant the Providers section in the OpenFeature docs:

With that said, the first practical thing we'll need to do when building our AirTable Provider is to install some relevant packages, which for Svelte are the airtable.js library and the OpenFeature Web SDK:
npm i --save @openfeature/web-sdk airtableWith those packages installed, we're ready to dig into our code over in main.js importing the relevant logic and creating a new AirtableProvider class:
import "./global.css";

import App from "./App.svelte";

+ import { OpenFeature } from "@openfeature/web-sdk";
+
+ import Airtable from "airtable";
+
+ class AirtableProvider {
+
+   constructor() {
+
+   }
+ }

const app = new App({
  target: document.body,
  props: {
    name: "world",
  },
});

export default app;
Having imported all of the relevant logic, in order to make our calls to the AirTable API, we next need to grab two key values from Airtable:
- ACCESS_TOKEN
- This can be created by following the instructions here
- BASE_ID
- This can be found by looking at the url for the "Features" table you created & searching for the string that resembles
appXXXXXXXXXXXXX.
After obtaining these keys, we now need to update our constructor to create a new Airtable object, and to create an airtableData array to be populated (via the API call) during the initialization phase of our new Provider.
import "./global.css";

import App from "./App.svelte";

import { OpenFeature } from "@openfeature/web-sdk";

import Airtable from "airtable";

class AirtableProvider {

-  constructor() {
+  constructor(accessToken, baseId) {
+
+    this.base = new Airtable({ apiKey: accessToken }).base(baseId);
+
+    this.airtableData = [];
+
+    this.initialize = async function () {
+      await new Promise((resolve, reject) => {
+        this.base("Flags")
+          .select()
+          .eachPage(
+            (records, fetchNextPage) => {
+              this.airtableData = [...this.airtableData, ...records];
+              fetchNextPage();
+            },
+            (error) => {
+              if (error) {
+                console.error(error);
+                reject(false);
+              } else {
+                resolve();
+              }
+            }
+          );
+      });
+    };
+
+  }
}

const app = new App({
  target: document.body,
  props: {
    name: "world",
  },
});

export default app;
With the initialization logic complete, the last thing we need to do to get our Provider up-and-running is to add a name to the metadata, and instantiate the client.
import "./global.css";

import App from "./App.svelte";

import { OpenFeature } from "@openfeature/web-sdk";

import Airtable from "airtable";

class AirtableProvider {

  constructor(accessToken, baseId) {

+    this.metadata = { name: "Airtable Feature Provider" };

    this.base = new Airtable({ apiKey: accessToken }).base(baseId);

    this.airtableData = [];

    this.initialize = async function () {
      await new Promise((resolve, reject) => {
        this.base("Flags")
          .select()
          .eachPage(
            (records, fetchNextPage) => {
              this.airtableData = [...this.airtableData, ...records];
              fetchNextPage();
            },
            (error) => {
              if (error) {
                console.error(error);
                reject(false);
              } else {
                resolve();
              }
            }
          );
      });
    };

  }
}


+ const airtableProvider = new AirtableProvider("accessToken","baseId");
+
+ await OpenFeature.setProviderAndWait(airtableProvider);
+
+ const client = OpenFeature.getClient();
+
+ console.log(client)

const app = new App({
  target: document.body,
  props: {
    name: "world",
  },
});

export default app;
Thanks to that console.log we added at the end of the file, if you run npm run dev and everything is working correctly, you should now see the OpenFeature client in your console and the following at localhost:8080:
Notes on Errors:
If your baseId is incorrect, you will see a blank page with the following message in your console AirtableError {error: 'NOT_FOUND', message: 'Could not find what you are looking for', statusCode: 404}If your accessToken is incorrect, you will likely see only a blank page with no error message.
Implementing the OpenFeature API
Now that we have our Airtable Provider initialized and functional, it's time to put it to work for some actual feature flagging by following the instructions over in the the OpenFeature Provider Docs. Most notably, this means adding the evaluation methods for the different types of flags (i.e. Boolean, String, Number and Object).
If you have used OpenFeature before you will know that to retrieve the value of a flag you will use something that looks like:
client.getBooleanValue("flag_id", default_value)With flag_id being the id of a flag you are looking for (i.e. your_name) and the default_value representing the default value for the flag in the event of any kind of error (i.e. false).
While getBooleanValue() is what you may call in the client, however, in the Provider things are a little bit different, with that method actually calling resolveBooleanEvaluation. So that will be the first method we build.
Resolving the Boolean Evaluation
Inside this method, we will first need to look through the airtableData object that we created during initialization, for a flag which has a Name that matches the flag_id we are looking for.
If a flag is found, we will then need to do some checks to see whether the:
- flag is enabled
- value is boolean
If either of these checks return false, we will return the default_value referenced in the code. Here is what that might look like:
import "./global.css";

import App from "./App.svelte";

import { OpenFeature } from "@openfeature/web-sdk";

import Airtable from "airtable";

class AirtableProvider {

  constructor(accessToken, baseId) {

    this.metadata = { name: "Airtable Feature Provider" };

    this.base = new Airtable({ apiKey: accessToken }).base(baseId);

    this.airtableData = [];

    this.initialize = async function () {
      await new Promise((resolve, reject) => {
        this.base("Flags")
          .select()
          .eachPage(
            (records, fetchNextPage) => {
              this.airtableData = [...this.airtableData, ...records];
              fetchNextPage();
            },
            (error) => {
              if (error) {
                console.error(error);
                reject(false);
              } else {
                resolve();
              }
            }
          );
      });
    };

+    this.resolveBooleanEvaluation = function (flagKey, defaultValue) {
+      const records = this.airtableData.find(
+        (record) => record.fields.Name === flagKey
+      );
+
+      if (!records) {
+        console.error("Flag not found:", flagKey);
+        return { value: defaultValue };
+      }
+
+      const flag = records.fields;
+
+      if (!flag.Enabled) {
+        console.error("Flag disabled:", flagKey);
+        return { value: defaultValue };
+      }
+
+     if (typeof flag.Value === "undefined") {
+        flag.Value = false; // Treat undefined as false
+      } else if (typeof flag.Value !== "boolean") {
+        console.error("Flag not a boolean:", flagKey);
+        return { value: defaultValue };
+      }
+
+      return {
+        value: flag.Enabled ? flag.Value : defaultValue,
+      };
+    };
};
};


const airtableProvider = new AirtableProvider("accessToken","baseId");

 await OpenFeature.setProviderAndWait(airtableProvider);

 const client = OpenFeature.getClient();
- console.log(client);
+ console.log('your_name', client.getBooleanValue('your_name:' , false);

const app = new App({
  target: document.body,
  props: {
    name: "world",
  },
});

export default app;
Similar to before, in the above code I added a console.log to test out whether the method is working. If our Airtable is setup as describes at the beginning of this process, this console.log should return: your_name: true
Moving Beyond Boolean Flags
Great, everything is working a described, but I'm guessing your name is not true 😂 ...
With this in mind, if we want to resolve string flags as well, we'll need to follow a similar process for implementing the resolveStringEvaluation method.
While we could simply follow the same process as above (with changes to check for string values) for conciseness, I chose to move all of the flag querying into a seperate queryFlag method, which is then called in the evaluation methods.
import "./global.css";

import App from "./App.svelte";

import { OpenFeature } from "@openfeature/web-sdk";

import Airtable from "airtable";

class AirtableProvider {

  constructor(accessToken, baseId) {

    this.metadata = { name: "Airtable Feature Provider" };

    this.base = new Airtable({ apiKey: accessToken }).base(baseId);

    this.airtableData = [];

    this.initialize = async function () {
      await new Promise((resolve, reject) => {
        this.base("Flags")
          .select()
          .eachPage(
            (records, fetchNextPage) => {
              this.airtableData = [...this.airtableData, ...records];
              fetchNextPage();
            },
            (error) => {
              if (error) {
                console.error(error);
                reject(false);
              } else {
                resolve();
              }
            }
          );
      });
    };

-    this.resolveBooleanEvaluation = function (flagKey, defaultValue) {
-      const records = this.airtableData.find(
-        (record) => record.fields.Name === flagKey
-      );
-
-      if (!records) {
-        console.error("Flag not found:", flagKey);
-        return { value: defaultValue };
-      }
-
-      const flag = records.fields;
-
-      if (!flag.Enabled) {
-        console.error("Flag disabled:", flagKey);
-        return { value: defaultValue };
-      }
-
-     if (typeof flag.Value === "undefined") {
-        flag.Value = false; // Treat undefined as false
-      } else if (typeof flag.Value !== "boolean") {
-        console.error("Flag not a boolean:", flagKey);
-        return { value: defaultValue };
-      }
-
-      return {
-        value: flag.Enabled ? flag.Value : defaultValue,
-      };
-    };

+this.queryFlag = function (flagKey) {
+    const record = this.airtableData.find(
+        (record) => record.fields.Name === flagKey
+    );
+
+    if (!record) {
+        console.error("Flag not found:", flagKey);
+        return null;  // Return null if no record is found
+    }
+
+    return record.fields;  // Return the flag fields if found
+};
+
+this.resolveBooleanEvaluation = function (flagKey, defaultValue) {
+    const flag = this.queryFlag(flagKey);
+
+    if (!flag) {
+        return { value: defaultValue };  // Return default if flag not found
+    }
+
+    if (!flag.Enabled) {
+        console.error("Flag disabled:", flagKey);
+        return { value: defaultValue };
+    }
+
+    if (typeof flag.Value === "undefined") {
+        flag.Value = false;  // Treat undefined as false
+    } else if (typeof flag.Value !== "boolean") {
+        console.error("Flag not a boolean:", flagKey);
+        return { value: defaultValue };
+    }
+
+    return {
+        value: flag.Value  // Return the value since it is valid
+    };
+};
+
+this.resolveStringEvaluation = function (flagKey, defaultValue) {
+    const flag = this.queryFlag(flagKey);
+
+    if (!flag) {
+        return { value: defaultValue };  // Return default if flag not found
+    }
+
+    if (!flag.Enabled) {
+        console.error("Flag disabled:", flagKey);
+        return { value: defaultValue };
+    }
+
+    if (typeof flag.Value !== "string") {  // Check if the value is not a string
+        console.error("Expected a string value for flag:", flagKey);
+        return { value: defaultValue };
+    }
+
+    return {
+        value: flag.Value  // Return the value since it is valid
+    };
+};

};

};

const airtableProvider = new AirtableProvider("accessToken","baseId");

await OpenFeature.setProviderAndWait(airtableProvider);

const client = OpenFeature.getClient();

- console.log('your_name:', client.getBooleanValue('your_name' , false);
+ console.log('your_name:', client.getStringValue('your_name' , 'World');
const app = new App({
  target: document.body,
-  props: {
-    name: "world",
-  },
});

- export default app;
+ export {app, client};
With a switch from a boolean to a string value, the other thing we'll need to do is update the Value column over in our Airtable, changing the type from a Checkbox to a Single Line Text and of course adding your name as that value (in my case Andrew).
If everything has worked you should see: your_name: Andrew in the console.
Using the Feature Flag in App.Svelte
You may have noticed one change that I haven't discussed yet in last code sample. This is the final line where we exported the OpenFeature client. This is so we are able to use the client over in our App.svelte file (this could also have been accomplished by creating a window.client variable, but I digress...).
With that export setup, using our new OpenFeature Airtable client is as simple as creating a new your_name variable in the script block which calls the getStringValue method, and then using that variable in the main block:
 <script>

+ import { client } from './main.js';
+ let your_name = client.getStringValue('your_name', 'World');
- export let name;

 </script>

 <main>

- <h1>Hello {name}!</h1>
+ <h1>Hello {hey_you}!</h1>

    <p>Visit the <a href="https://svelte.dev/tutorial">Svelte tutorial</a> to learn how to build Svelte apps.</p>

 </main>

 <style>

	main {
		text-align: center;
		padding: 1em;
		max-width: 240px;
		margin: 0 auto;
	}

	h1 {
		color: #ff3e00;
		text-transform: uppercase;
		font-size: 4em;
		font-weight: 100;
	}

	@media (min-width: 640px) {
		main {
			max-width: none;
		}
	}

 </style>
If everything has worked out, you should see a change like below, with that old unpalatable "World" text replaced with your own scrumptious name:

What's the next course?
Well truth be told is this is a fairly basic (read: incomplete) implementation of the OpenFeature standard 😅.
Additionally, with the Provider built in Javascript versus Typescript it means a lot of the checks and balances which help ensure everything runs smoothly are just not present. More than that, we haven't' even looked at the concept of context yet, which is needed in order to implement more fine-grained targeting rules for who will actually be served a particular flag.
With all that in mind, this is meant to be an introduction to what it looks like to build an OpenFeature Provider so you can start on that process yourself.
Where can I find your code?
You can find an example of the final code from the tutorial over in the DevCycle Sandbox GitHub Organization.
DevCycleHQ-SandboxPlease note there is one additional change here, with our use of an environment variable to store our ACCESS_TOKEN and BASE_ID.